|
|
Fiat Racer |
|
|
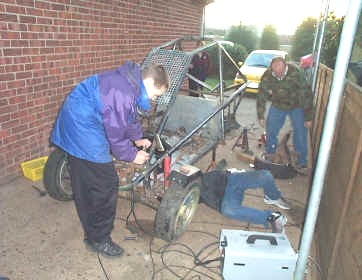
Updated May 04 - the final developments Having spent a couple of years trying to squeeze every last drop of performance from my car, time had now arrived to start from scratch and try build a Hamish beating racer. From the last couple of races it was apparent that Kevin Archibald (my girl friends brother) was game him to give him a run for his money, given a quick enough car. My car could take no further development with its road going extras. Hamish has always had an edge over us, working for a company that works on Formula 1 cars, with some of its know how rubbing off on the humble Blitz. So what have we learned ? Make it light Make it tough Tune for torque, not ultimate power. Reduce the engine load as much as possible. As it happens on a trip to Bath a road legal Blitz was seen sitting on a trailer outside a tyre depot. It was a mess but up for sale. With £350 having passed hands it was on course for a rebuild to the "Ultimate racer". I would help rebuild the car, with Kevin racing it combined with his teenage son Ben (Also ultra light weight). So we set to work. The car had been sprayed red, green and yellow. A couple of weekends work saw a good deal of paint stripped, followed by all the mechanics removed.
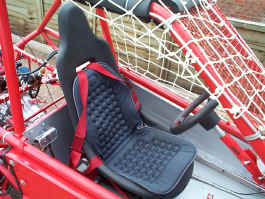
Keeping the car light. Not that easy to achieve. The basic frame cannot be lightened easily. I have seen attempts to lighten the Fiat suspension parts by cutting large holes in the rear swing arms. Having seen one of these fracture in use (admittedly rusty) this is not an area I would care to weaken any more. The king pin uprights and brake drums are also very heavy, but again not easy to remove material from. This only leaves the bolt on bits. The fuel tank has been replaced with a "Paddy Hopkirk" 1 gallon jerry can that fits nicely behind the seat. (The cars use about 1 ltr every 10 minutes or racing so 4.5 litres is plenty) This is steel, but still pretty light as the metal is thin. At £14 this is a good option compared to a £70 aluminum equivalent. The rear crash bar has been made as small as possible, just to protect the engine, as the tubing is very heavy. All the switch gear and steering lock have been removed, and the dash replaced with tailor made aluminum parts. For the seat I have gone for a basic polythene seat available from Europa Specialist spares at about £85 + vat (part number 183573). This is reasonably light at 6kg. ( A steel framed cheap bucket seat weighs in at up to 10 kg). This has no padding what so ever, but I found a local motor shop comfy cushion designed for grand dad's old bum, that does very nicely at £6. It can be easily washed and won't hold the water like the padded bucket seats I have tried so far. I have managed to incorporate some adjustable "cobra" runners (Merlin Motorsport £16), having carefully made mounting brackets to avoid hitting the gear shift rod that runs directly under the seat. These have added at least 2 kg to the overall weight unfortunately. The only other area left is the engine, where the fan, fan housing, and all the air ducting have been removed. Cooling will be taken car of with two small electric fans. (see below).
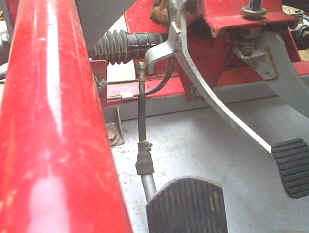
Painting the frame. Having welded a multitude of small brackets, wire mesh and the crash bar to protect the engine, its now time to paint the frame. The frame was finally cleaned with an acid based alloy wheel cleaner (available from a local car paint stockiest at £8 a gallon) and then washed off. The cleaner eats into the metal surface and also removes surface rust as it contains phosphoric acid, making a good surface to paint. A final wipe over with cellulose thinners ensured no traces of grease remain. As this car will be pulverized with stones during racing, a top class finish is not really needed. Having said that hand painting can make a real mess, so a basic spray job is the answer. It is quite difficult to spray tube over a flat panel, as you have to move evenly around the tube to get an even coat. Choose of paint type can make a big difference to the ease of the job. Standard cellulose paints take some skill to get right even in ideal conditions, with runs or a matt finish normally being the order of the day for the novice. Its also not suitable spraying in low temperatures or high humidity. Metallic acrylics can give a good finish, as the base coat is only a colour, but then 3 or 4 coats of lacquer are needed, that again can be difficult to get correct without runs around the tubing. Two pack is out of the question without an air fed mask. So what's the answer? After various attempts the best easy finish for DIY with cheap equipment is achieved using the "Smoothrite" range of paints made by ICI (under the brand name Finnegan's) and sold just about every where. This is sold primarily as a hand brushing paint to cover rust directly, and accordingly it does not stick well to clean unprimed metal and runs off. The answer here is 2 or 3 coats of a high build etch primer. Etch primer can be used on steel, aluminum, and zinc plating unlike standard primers so can be used on the zinc coated panels. One litre of primer (plus one litre of activator) will cover a blitz frame. Its available in car paint suppliers. Just spray it on, and don't worry about flatting between coats. Now the top coat. Get a cheap gravity feed gun at around £20. A siphon gun will have trouble picking up the paint. Thin the Smoothrite very slightly (at about 5 -10%) until it literally spits out of the gun in a course spray. If its too thin it will run badly as the paint does not "flash" off fast enough to prevent this. The gun pressure needs to be around 50 psi. I use an anti bloom cellulose thinner. The instructions on the Smoothrite say this is not suitable, but I have had no problems using it whatsoever. I get the impression that ICI just want to sell their £6 a litre thinner over the normal £8 a gallon stuff. At this viscosity the paint will still level like a brushing paint, so the atomization is not really important. As its so thick in spraying terms it forms a thick coat without running . Also it will cover a multitude of sins and only one coat is needed for a good thick colour. If it does run, careful use of a brush can blend the run in before it dries. I have also sprayed this out side at near freezing conditions with no loss of gloss as it dries. It now needs to be left for at least a week to harden (6 weeks is the full hardening time.). Small items can be sprayed using a cheap model makers air brush airbrush. Once hardened it seems well up to the job. The metallic silver does appear to be even harder than the plain paint colours. Reconditioning suspension parts. Some parts are no longer available from Fiat (like bushes), but are readily available from Middle Barton garages. The leaf springs have been split to remove the 2nd and 3rd link, and all parts given a coat of smoothrite silver. All brake components (lines and cylinders) are replaced. The rear suspension has wheel intrusion bars fitted, and metal loops welded over the damper bolting points to protect the damper threads. Rear springs are painted and the "grayston" spring assistors fitted. These need to be boiled in water for a few minutes to make them soft enough to squeeze in between the coils of the springs. Brakes. All cylinders, shoes, rubber hose and brake lines replaced, In standard form the front brakes are too powerful locking up into corners. I have overcome this by fitting a brake bias valve. These vary in price from about £45 upwards. The price seems to depend on the units weigh, with a basic cast iron unit being cheapest (Like the Aldon unit from Demon Tweeks ) This is heavy, but has two outputs, so an extra brake T is not needed to feed both front cylinders, unlike the lighter alloy units. Put one of these inline with one of the twin outputs that feed the front cylinders, and block the second one off. Setting up simply requires stomping on the brakes on the dirt, and tweaking the valve until the 4 wheels lock at the same time. I have noted that the two front cylinders are a larger diameter than the rear. It is possible to fit a pair of rear cylinders to the front to reduce the power of the front, but no fine adjustment is available. Electrics. Not a lot of wiring is needed, but a good way of making a really neat loom from the dash to the rear of the car is to use 7 core trailer cable. This is about £1.50 a metre. Give yourself enough length to strip the outer sheath off and use each wire to the various electrical items. Pedals. The standard throttle mechanism runs across the floor right where you need your heals to be, so a new system was made up with a rod running across the top of the pedal box. A full throttle switch has been incorporated which cuts the alternator out at full load (Just interrupt the green wire to the regulator to do this) to release the odd extra horsepower. Battery charging will only take place on less than full throttle or over run. A second switch is fitted to the dashboard to allow the alternator to run all the time should the battery start to flatten.
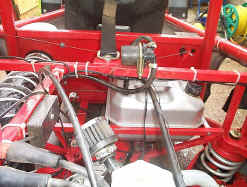
Dampers 4 KYB gas dampers fitted. (these have proved a little hard and the orgional oil filled units are a better bet) Battery. Extra brackets welded above the steering rack to hold a 17AH sealed gel golf caddy battery. This is the best position to try and move some weight forward.
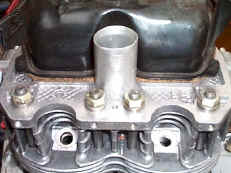
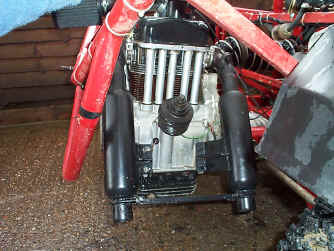
Steering Rack. This is too low a ratio in standard form, making the car very hard to control in slippery conditions as it over steers. One club member has fitted a high ratio rack from a Caterham with great success. I think this is a relatively humble Ford Capri rack housing. I have managed to get high ratio pinions for the Fiat rack from Transautosport, but having now purchased the remaining stock for myself and other club members, unfortunately no more production is planned (unless I want another 20!). These pinions are larger but still fit within the rack body, by moving the rack itself across within the housing. This means various minor mod's to the plunger system that pushes the rack against the pinion, but its not rocket science. The result is about half a turn less lock to lock. May not sound like a lot but it makes a big difference. Rebuilding the gearbox. The gear clusters wear badly over time. Lack of syncromesh on first does not help. The first sign of imminent failure is it Jumping out of gear when trying to pull away. Replacement gear sets are available from Middle Barton at around £90 that will replace all the gears affected. To rebuild the ‘box is not a quick job, but not impossible. It involves removing the bell housing and the diff’ preload plates on each side of the box, carefully noting the positions of the preload rings and on which side of the box the plates go. Following the Haynes manual the box needs to be disassembled step by step. A couple of points are worth bearing in mind. When removing the selector shafts take care not to loose the plungers located in the gearbox housing and the small pin that runs through the second selector shaft. Also undoing the the castle nuts on the end of the pinion shafts can be very hard as you have no leverage on the gearbox itself. I ended up holding up one of the nuts in a vice, and then rotating the gearbox itself whilst holding it in a towel to get a good grip. Take care not to loose the small ball bearing that locates under the speedometer drive gear after the castle nut is removed on the main pinion shaft. Once the pinion shaft is removed all the gears and syncromesh rings fall in a pile in the bottom of the box. Try and hold them together as you remove them to keep the order correct. Don’t rely on the Haynes manuals assembly diagrams, its not that easy to work out what goes were with a pile of bits. Luckily I had a spare gearbox to hand for reference. The correct sequence needs to be followed on reassembly or bits wont fit back. It took me around 5 hours to strip, clean and reassemble the box. Engine After trying to keep various old engines running, finally a brand new Polish engine was sourced from Middle Barton Garages at reasonable cost. The head was skimmed to 1.6 mm and fully ported. An aluminum pipe has been glued (J B Weld) into the inlet port, so a bike carb could be fitted. A lightened flywheel was fitted and alloy increased capacity sump, with extra oil baffle plates fitted for the hard cornering forces.
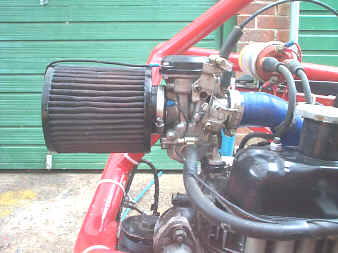
The cam profile chosen was the 280' "Abarth" profile offered by AES. This has less duration and more lift than the last cam tried, that was not suited well to the wide gear ratios and the torque required off road. Removing material from the back of the valves can help with the low lift flow and torque, but Im not prepared to try modifying the standard valves should they weaken and then drop a head off. Carb' I have not been able to get a KLR250 carb', so a bank of 4 tatty carbs off a GPZ 900 being the correct size for the 300 cc cylinder displacement where purchased for £20. The carb's are locked together with metal bars, but can be separated. Only one carb' has the cable fittings, and the various fuel and air pipes that feed the other carb's need blocking off. Final jetting can only be done once the engine is in the car and running. At least I have plenty of spare bits now !
Silicon radiator rubber hose was used to connect to the carb'. The hose may need a small
piece of alloy tube glued in (super glue) at its mid point to stop the tube from
collapsing under vacuum. The carb’
also needs to be rubber mounted in some way, as the hose on its own is not rigid
enough. Adjust
mixture by drilling main jet and / or lifting needle with spacers. You may need
to lift the needle by several mm. Fit
as bigger air filter as possible. The very fine chalk dust we experience has
managed to get through foam type filters, but the cotton gauze type filters work
better. Its worth using slightly heaver oil than the standard
filter oils, (like a 3 in 1 oil) as the filters are cleaned after each race
meeting.
A worthwhile mod is to ground the fuel pump
through a fixing on the air filter intake. If the filter falls off, the pump
stops and stops the engine drawing in dirt.
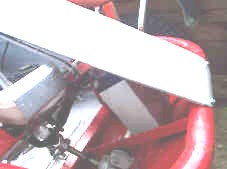
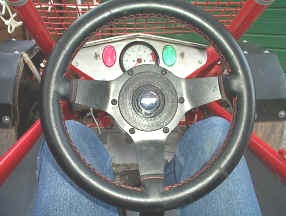
Ignition I finally used a twin output coil, remove distributor cap and rotor arm and replace with cap and seal (to keep out the dust), and fitted transistor ignition. This has proved reliable Wheels and tyres I had some rusty wheels shot basted, (does not cost a lot and saves huge amounts of time) only to end up with one with a small hole in one. This was filled, and the rims then sprayed. Leakage will not be a problem as all the wheels have inner tubes fitted. 155x 12" kingpin mud and snow remoulds are fitted. Dashboard. A lightweight aluminum dashboard and front shield are made from scratch to remove the Fiat items. A switch on the dashboard over rides the "alternator" off switch should the battery start to flatten.
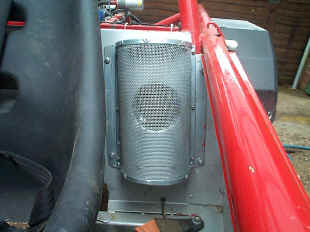
Engine Cooling
I fFabricated
a huge mesh intake next to the seat with a pipe leading to the fan. The bigger
the better to stop it being blocked with straw and dirt. Throw away the thermostatic
housing, but fabricate small metal prices to keep the airflow close to the
cylinder walls.
Exhaust system The after market big bore systems have proved to be very poor in allowing the gas out at high speed. 2 cherry bomb type silencers (pretty much straight through) have been fitted with great success, although too noisy for road use!
Safety stuff.
|