Author Topic: 500 restoration (ish)  (Read 5215 times)

0 Members and 1 Guest are viewing this topic.

michaelodonnell500

  • Super Member
  • ***
  • Posts: 758
  • Karma: 7
500 restoration (ish)
« on: June 26, 2015, 01:35:31 PM »
I've moved this from the 500 chat section as the holes in the floor got quite big so it seems to be a restoration now rather than a repair!

I have been meaning to get my 500 back on the road for a while now. It's been over 4 years since it passed the last mot! So I gave the floor a poke and a prod and found it was a bit worse that I thought.
I started off with a rusty patch at the front passengers side


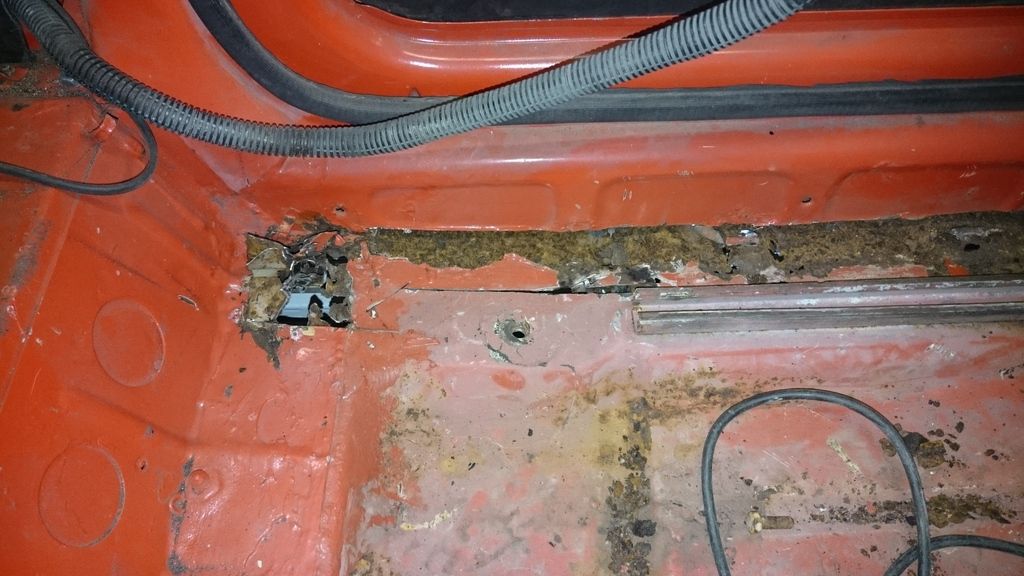
then I noticed that inner sill to floor joint was rotten, along with the floor to outer sill joint. Nice!


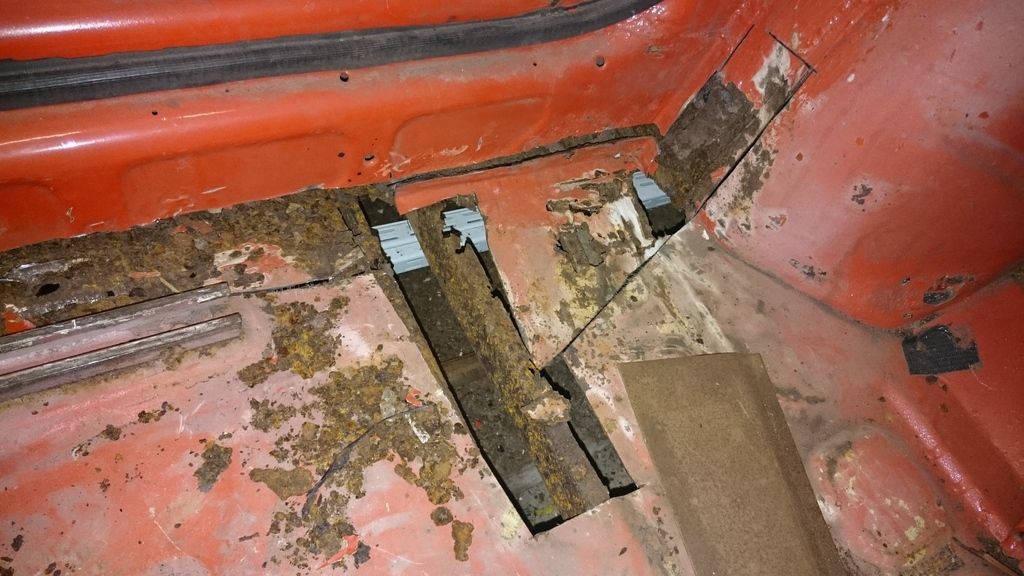
And the inner wheel arch where it meets the floor:


And where it joins the rear arch:


The outer sill looking very sorry for itself:


So after cutting away all horrible forms of rust and starting to lose sanity, I reached the point where I could start fixing things! Excuse the poor welding, I'll get onto that later;


New bottle of Hobby gas!
£60 deposit (rent free)
£35 for every refil.


I had a 3/4 full BOC Y bottle (the one that's almost impossible to lift) and after leaving the garage late one night I left the bottle open, the regulator open and then in my absence the torch dropped landing on the trigger and vented the whole bottle to atmosphere.

When I discoverd this (just about to weld a small panel I had been fettling for over an hour) I left the garage, locked the door and bought beer. :cry:


Clearing the way for the new outer sill:


New panels were not readily available when this was first restored which is a shame as it would have made life much easier!

More to come I am just waiting for some photos to upload.


Rust does not discriminate

shielsy

  • Super Member
  • ***
  • Posts: 721
  • Karma: 0
Re: 500 restoration (ish)
« Reply #1 on: June 26, 2015, 01:48:38 PM »
for the few pounds it is i would replace the floor its a better  and more pleasing to the eyes , make sure to paint all the repairs and new panels before fitting , check mine ,

shielsy

  • Super Member
  • ***
  • Posts: 721
  • Karma: 0
Re: 500 restoration (ish)
« Reply #2 on: June 26, 2015, 01:49:29 PM »

michaelodonnell500

  • Super Member
  • ***
  • Posts: 758
  • Karma: 7
Re: 500 restoration (ish)
« Reply #3 on: June 26, 2015, 02:04:08 PM »
for the few pounds it is i would replace the floor its a better  and more pleasing to the eyes , make sure to paint all the repairs and new panels before fitting , check mine ,


I had toyed with the idea and It is a very good point, but I felt that if I went down the route of a new floor at this stage it was going to feel like I was never going to get it done.

This car had been restored back in 1995 by my dad and I but panels were not readily avaiable so most of the repairs were cut out and re-weld, no patches though.

The last few years have needed a few more hours with the welder, but this year was just a little bit more than a small repair section could fix.

Once my son's a bit older and he's bored of spending time with his Dad then I will embark on a proper restoration.

Ideally I want to replace:
  • Front inner and outer wings
  • Rear wings
  • Floor
  • Doors

I've seen your your pictures and I like the work.
On the sunject of painting the panels - I'll jump back to that a bit further on.
Rust does not discriminate

shielsy

  • Super Member
  • ***
  • Posts: 721
  • Karma: 0
Re: 500 restoration (ish)
« Reply #4 on: June 26, 2015, 02:07:38 PM »
like the wedding photo  ;D

michaelodonnell500

  • Super Member
  • ***
  • Posts: 758
  • Karma: 7
Re: 500 restoration (ish)
« Reply #5 on: June 26, 2015, 02:20:43 PM »
This part here was rotten:


So I cut out the worst of it and welded in a new part:


I offered up the outer sill. Not an exact fit which is not helped by me keeping as much of the rear wing section as possible to make up for the poor condition of the rear arch:


With the door in place I set the hieght of the sill to maintain the door gap:


At this stage the photos might go a bit out of phase. I welded in the new outer sill, then cut away the inner sill and welded in the new sill:


Then I started to weld in the floor repair section.

Shielsy - I won't lie,  it was a bit of a headache. working with new panels is far easier!


This is another bit of the floor section I needed to replace. A bit of a pain, but most of it is done now.


Front arch repair panel offered up:


The main issues were the  sill not being a perfect panel. The distance between the door opening and the rear arch was a little sort so I had to open it up and re-set it.


« Last Edit: June 26, 2015, 02:37:50 PM by michaelodonnell500 »
Rust does not discriminate

michaelodonnell500

  • Super Member
  • ***
  • Posts: 758
  • Karma: 7
Re: 500 restoration (ish)
« Reply #6 on: June 26, 2015, 02:36:41 PM »
Shielsy - I have not painted any of the new panels and as you can see they are now all held in place with shiny new bits of weld!

I applied zinc primer to the panels that I made that couldn't be accessed after welding.

I had been reading this article on cavity seal:

http://www.classicsmonthly.com/2013/04/25/3-year-anti-rust-test-results/

it's the first item I've come accross with a real world comarison test of cavity seal and there were a few clear winners, one of which I will be looking to buy.

I am hoping that will be enough to keep the rust at bay as I'm not taking those panels off again!!
Rust does not discriminate

shielsy

  • Super Member
  • ***
  • Posts: 721
  • Karma: 0
Re: 500 restoration (ish)
« Reply #7 on: June 26, 2015, 03:01:28 PM »
looking good , thats the reason why I  paint the new panels before welding anf fitting as well as inner structures , then i mark where am welding and grind of the paint threr , so theres paint between the welds , one of the best ways i do is to mix some ZINC  primer lightly thinned with thinners and poured into stone chip mixed and sprayed into box sections inner panels it will find its own levels and come out if it finds wee gaps between welds and is fully paintable when dry ,


Rusty's Uncle

  • Subscriber VIP+
  • Super Member
  • *****
  • Posts: 2837
  • Karma: 34
Re: 500 restoration (ish)
« Reply #8 on: June 26, 2015, 05:53:36 PM »
Michael , that single malt whiskey is very corrosive when the bottles tip over and leak into the car  :P

DeVilleChris

  • Subscribers
  • Super Member
  • ****
  • Posts: 1216
  • Karma: 7
    • Club 126 UK
Re: 500 restoration (ish)
« Reply #9 on: June 26, 2015, 09:42:54 PM »
Ha ha ha, yes that Jura is a killer!

Nice work on the car though! :)

Chris
1979 Fiat 126 DeVille
1979 Fiat 900T Amigo

michaelodonnell500

  • Super Member
  • ***
  • Posts: 758
  • Karma: 7
Re: 500 restoration (ish)
« Reply #10 on: June 27, 2015, 11:58:24 AM »
See if you can spot the safety hazards from last night's work

IMG][/IMG]

Sent from my D5803 using Tapatalk

Rust does not discriminate

shielsy

  • Super Member
  • ***
  • Posts: 721
  • Karma: 0
Re: 500 restoration (ish)
« Reply #11 on: June 27, 2015, 12:58:19 PM »
whiskey flask and no guard on grinder  :P

DeVilleChris

  • Subscribers
  • Super Member
  • ****
  • Posts: 1216
  • Karma: 7
    • Club 126 UK
Re: 500 restoration (ish)
« Reply #12 on: August 02, 2015, 12:43:53 AM »
Any more updates Michael?

Chris
1979 Fiat 126 DeVille
1979 Fiat 900T Amigo

Piotross

  • Super Member
  • ***
  • Posts: 346
  • Karma: 7
Re: 500 restoration (ish)
« Reply #13 on: August 14, 2015, 09:51:38 PM »
Lot of rusty. It will be good to see epoxy primer for all elements.